Installing and Activating OilFlow2D
OilFlow2D installation includes the most current version of QGIS that has been tested to work with the model. This section will assist you in setting up OilFlow2D and enabling it in QGIS.
Hardware Requirements
OilFlow2D is supported on 64-bit computers running MS-Windows Operating System versions 7 through 11. It is recommended to use a computer with a minimum of 4 GB of RAM and at least 10 GB of free hard disk space. OilFlow2D is capable of running in modern Intel single processor computers. If multiple-core processors (Duo, Quad, etc.) are available, the model can execute in parallel processor mode, thereby running much faster than in single processor computers. In addition, using the OilFlow2D GPU option, the model can take advantage of NVIDIA Graphic Processing Unit (GPU) cards to run up to 700 times faster than in single-processor computers.
Software Installation
- If you are installing on a PC running Windows 7 or later, you must be logged on the PC as an administrator before you begin the installation.
- Download your software from the link provided when purchased.
-
Run the installation.
Note
Reboot will be required. Please reboot before proceeding to the next section.
Software Activation
- Standalone - A single license for one computer.
- Network - A centralized license that allows multiple concurrent users depending on license count purchased. This requires additional license manager software to be installed on an accessible computer on your network.
Standalone Activation
Use this activation mode if you have received a single-user stand-alone software license key. If you received a network license key, please proceed to the the next section.
- To activate your software, you must open DIP (Hydronia DIP) shortcut on your desktop.
- In the Control Data section on the left side, go to Options and select License.
-
You will be prompted to select one of three options:
- Reactivate License
- Install Network License Server
- Check for Updates
-
Select Reactivate License.
-
The following dialog will appear:
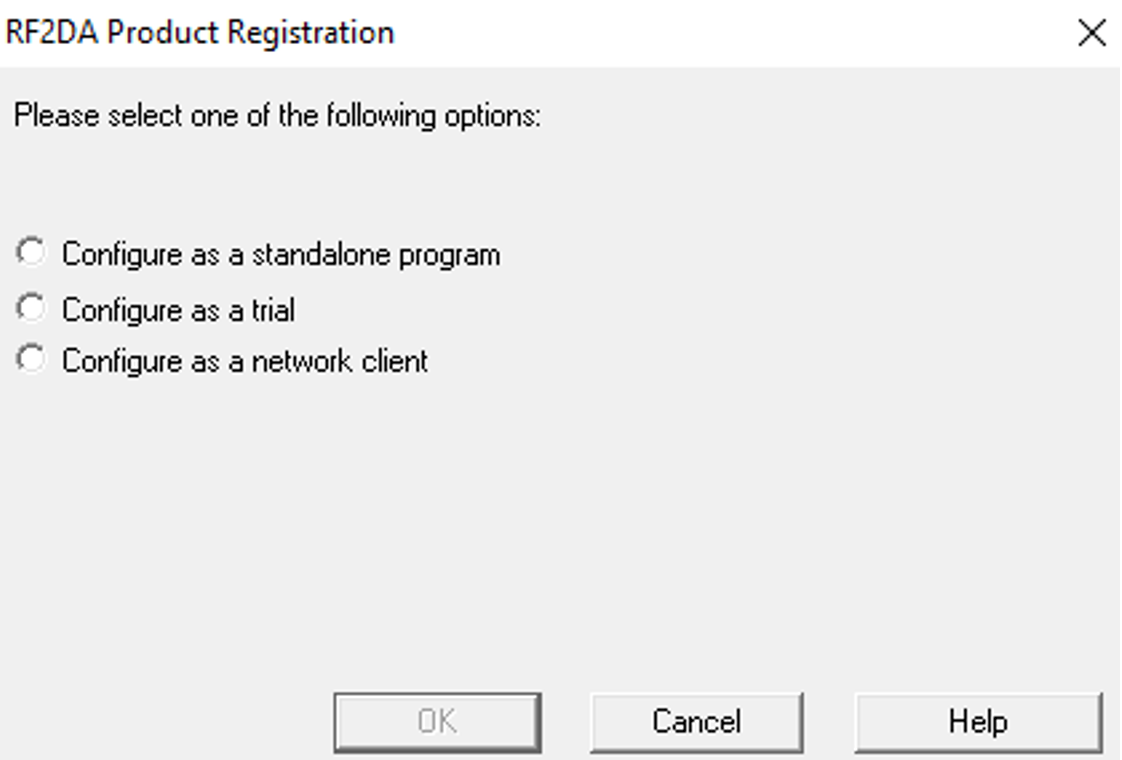
-
Select Configure as a standalone program.
-
Enter the license key provided to you (e.g. ):
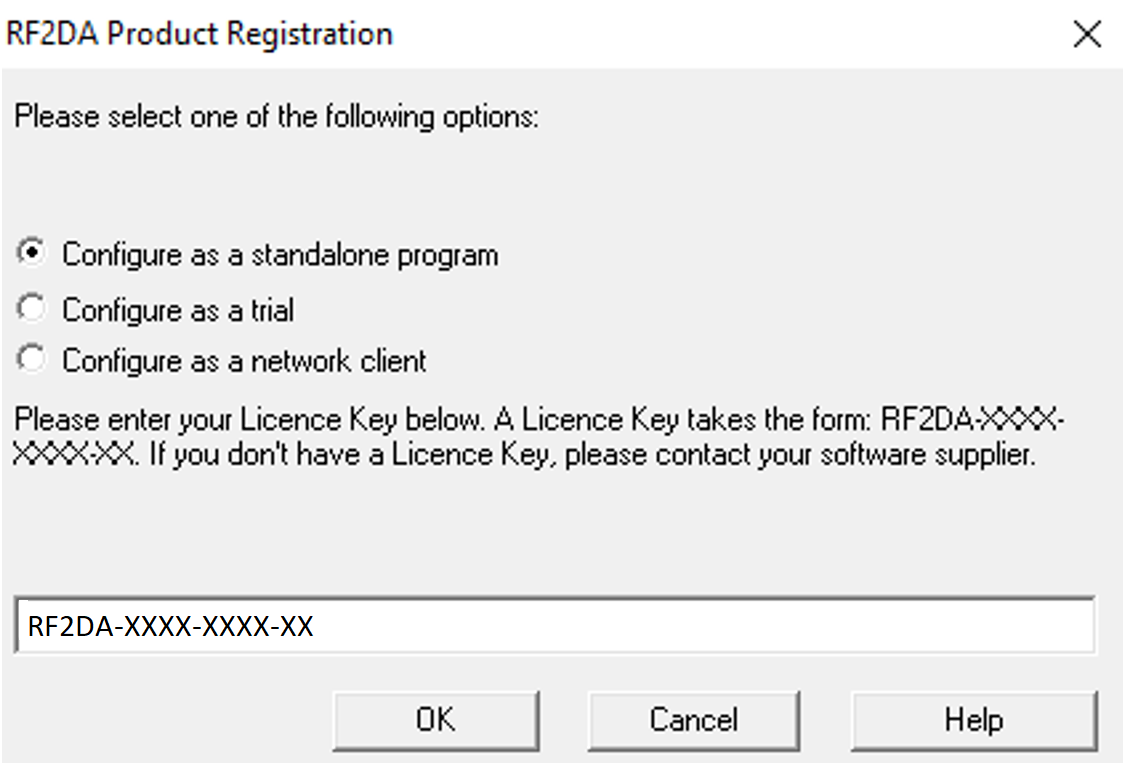
-
Click OK.
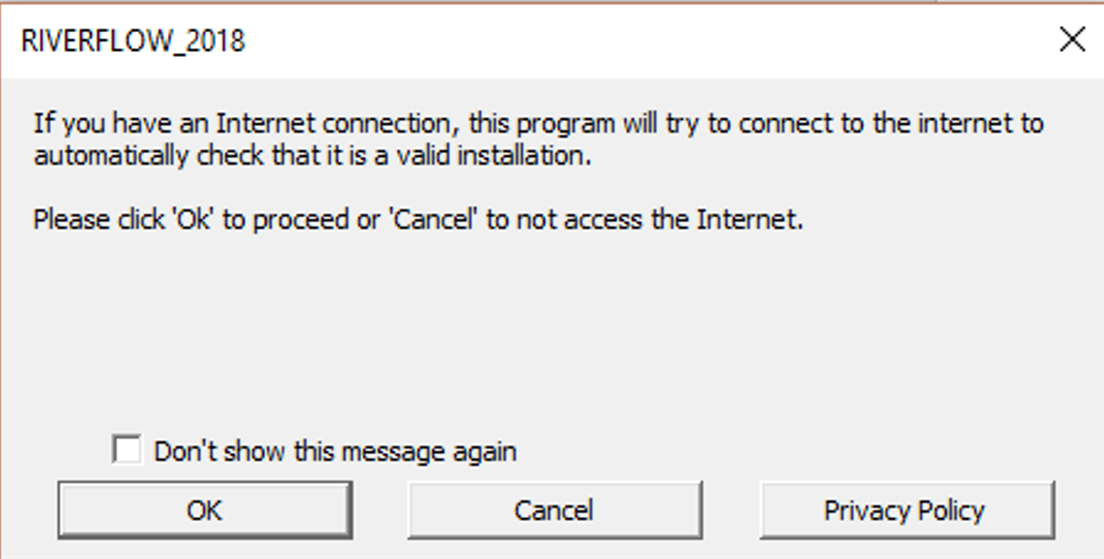
-
The protection system will connect to the website to check the settings defined for this product code and license. Click OK in the dialog.
-
The next dialog asks for the Product Registration data. Please fill out the required fields:
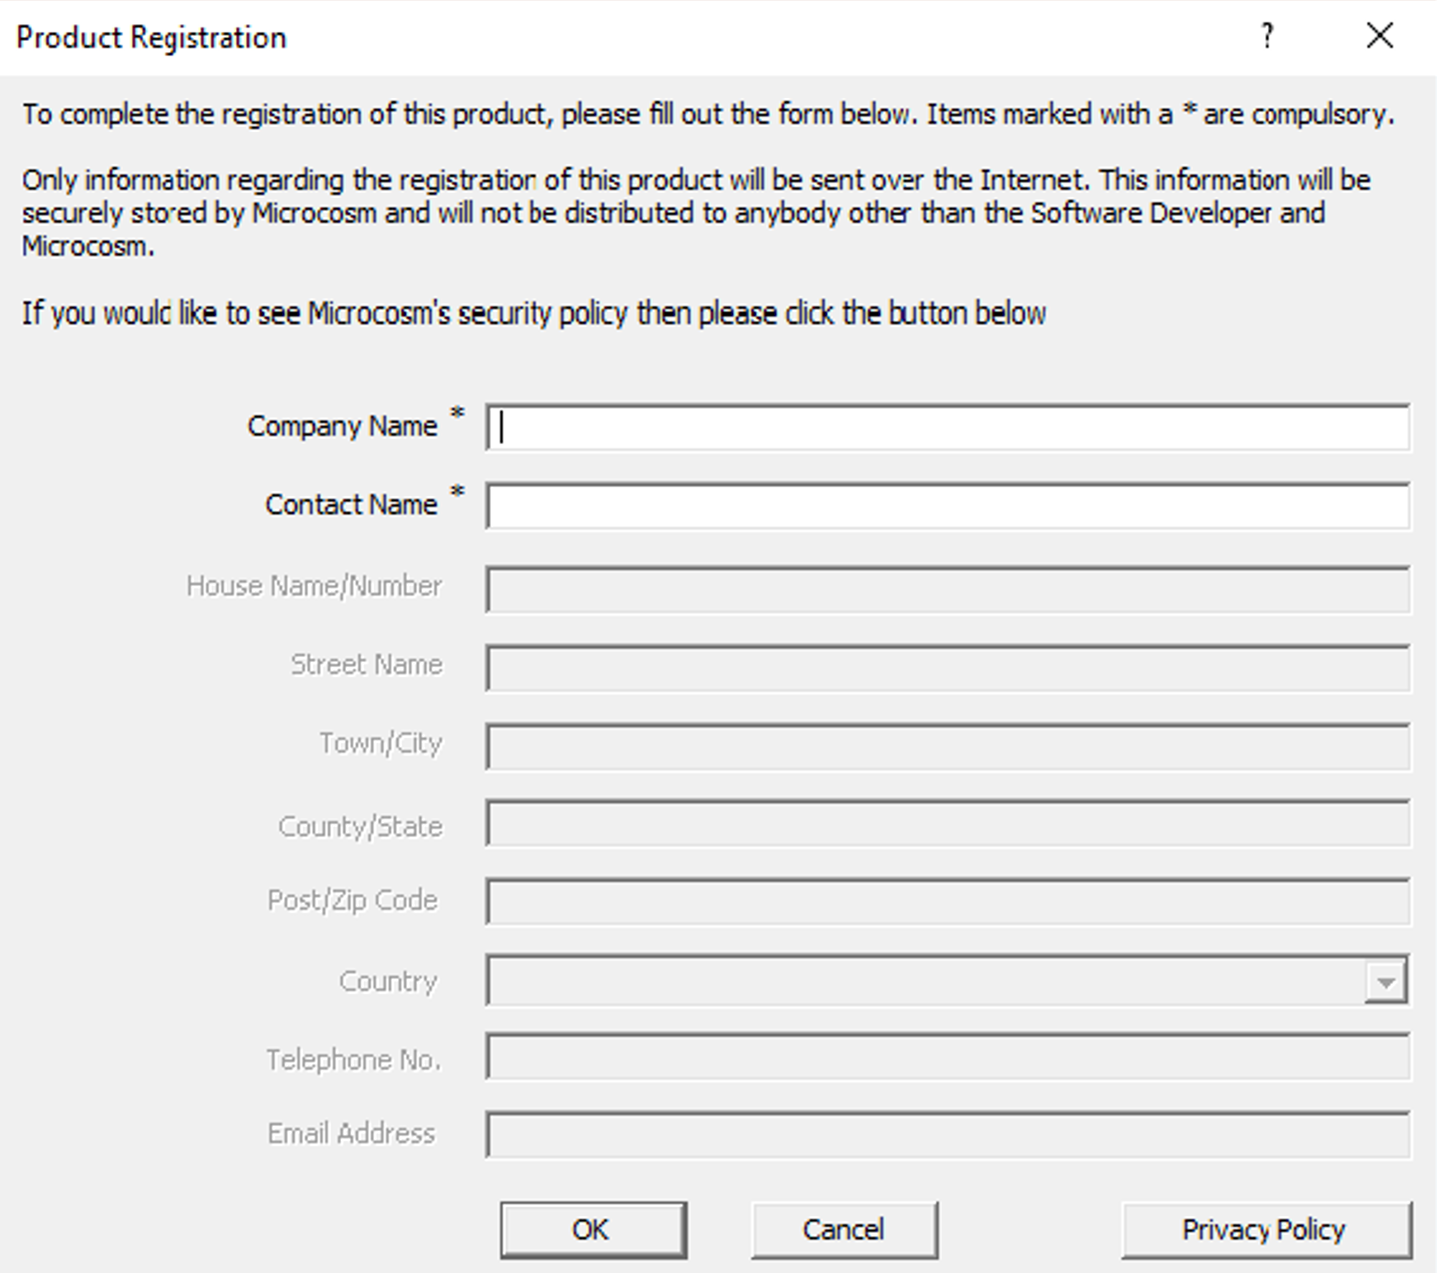
-
Once registration is complete, please proceed to the section Enabling Hydronia Plugins in QGIS.
Network Server Installation
Use this activation mode if you have received a network license key. If you received a standalone license key, use the activation procedure described in the previous section.
A network installation allows the use of your software on any number of machines on the same network, but limits the number of simultaneous users of your software.
The client machines will communicate with this server to carry out protection checks.
The Network Administrator will need a license key (configured to allow network installation) to activate the installation on the server. It is recommended that the Network Administrator does not reveal this license key to end-users, to avoid the potential confusion of the user trying to activate their copy of your software as a single user installation using that license key (this will not work).
The Network Administrator runs with its associated files (defined and distributed by Hydronia) in the network server.
- To activate your software, you must open DIP shortcut on your desktop.
- In the Control Data section on the left side, go to Options and select License.
-
You will be prompted to select one of three options:
- Reactivate License
- Install Network License Server
- Check for Updates
-
Select Install Network License Server.
-
will display a configuration window.
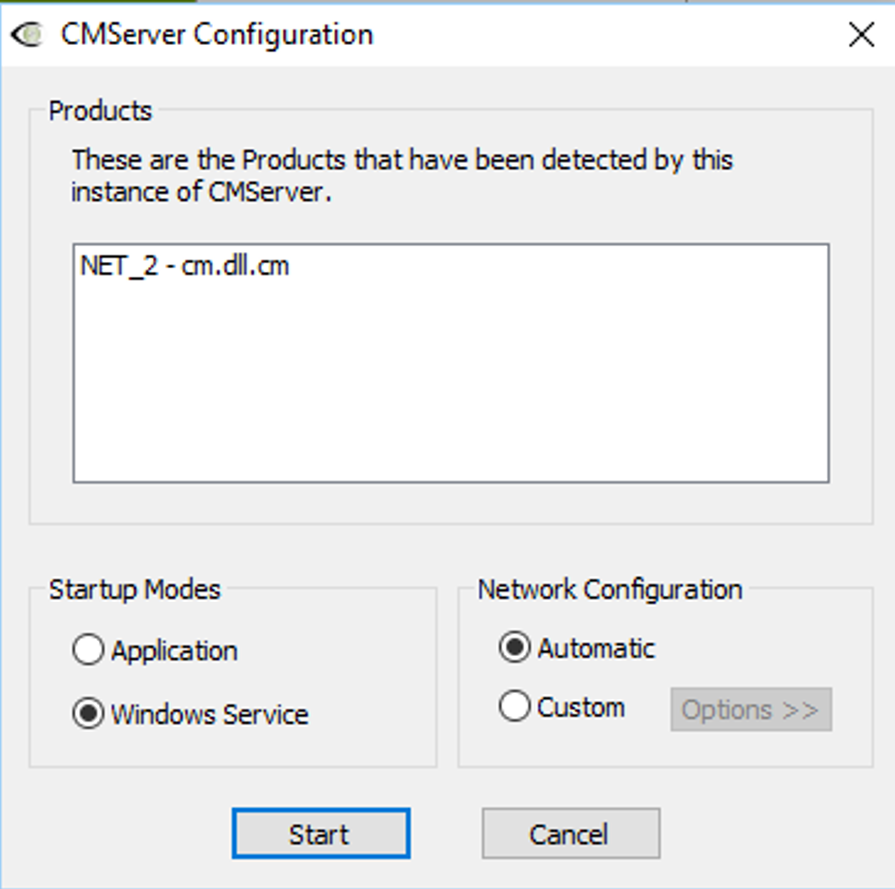
-
Choose Startup Modes as Windows Service.
- In Network Configuration, select Automatic.
- Click Start.
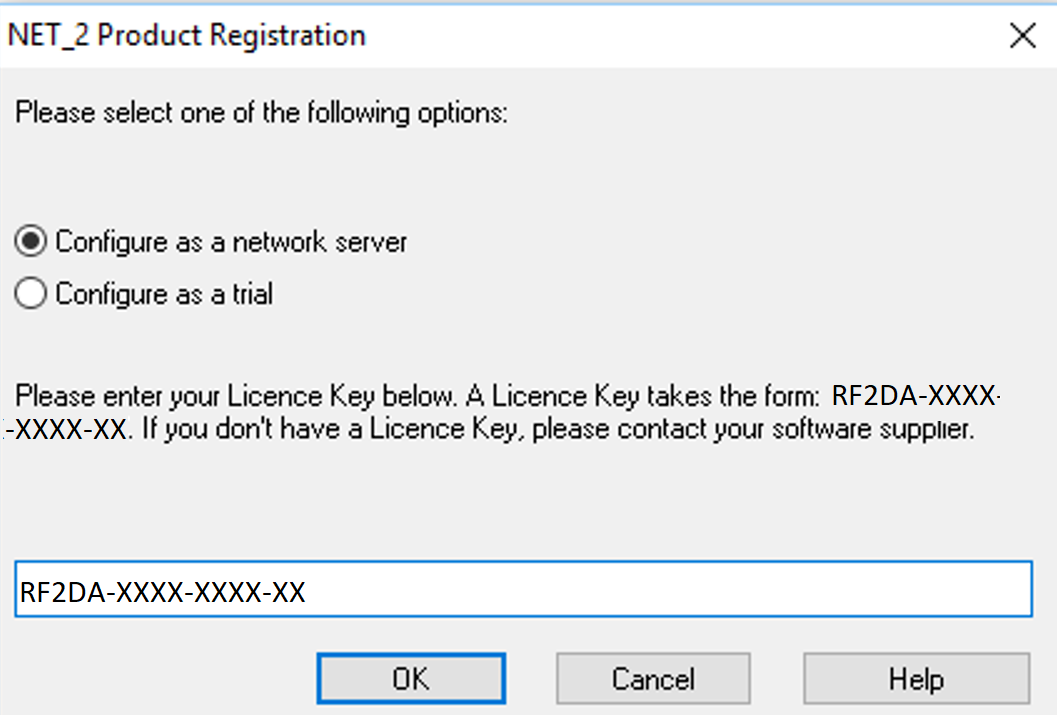
-
After clicking Start, enter the License Key provided by Hydronia.
-
You will be prompted to add an exception to the firewall rules.
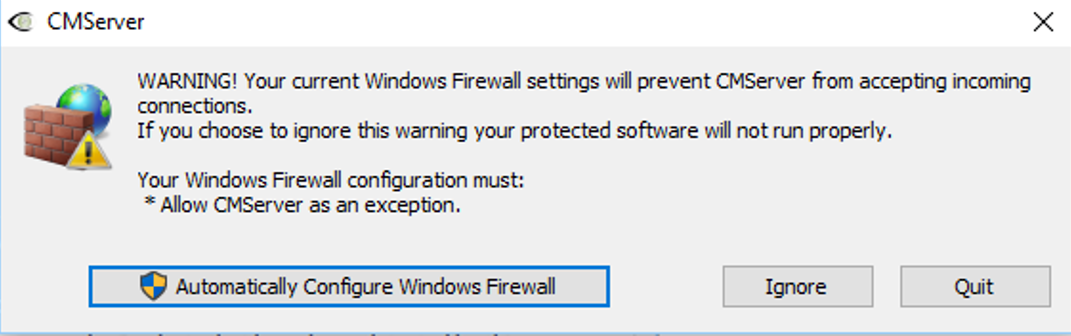
-
Select Automatically Configure Windows Firewall.
-
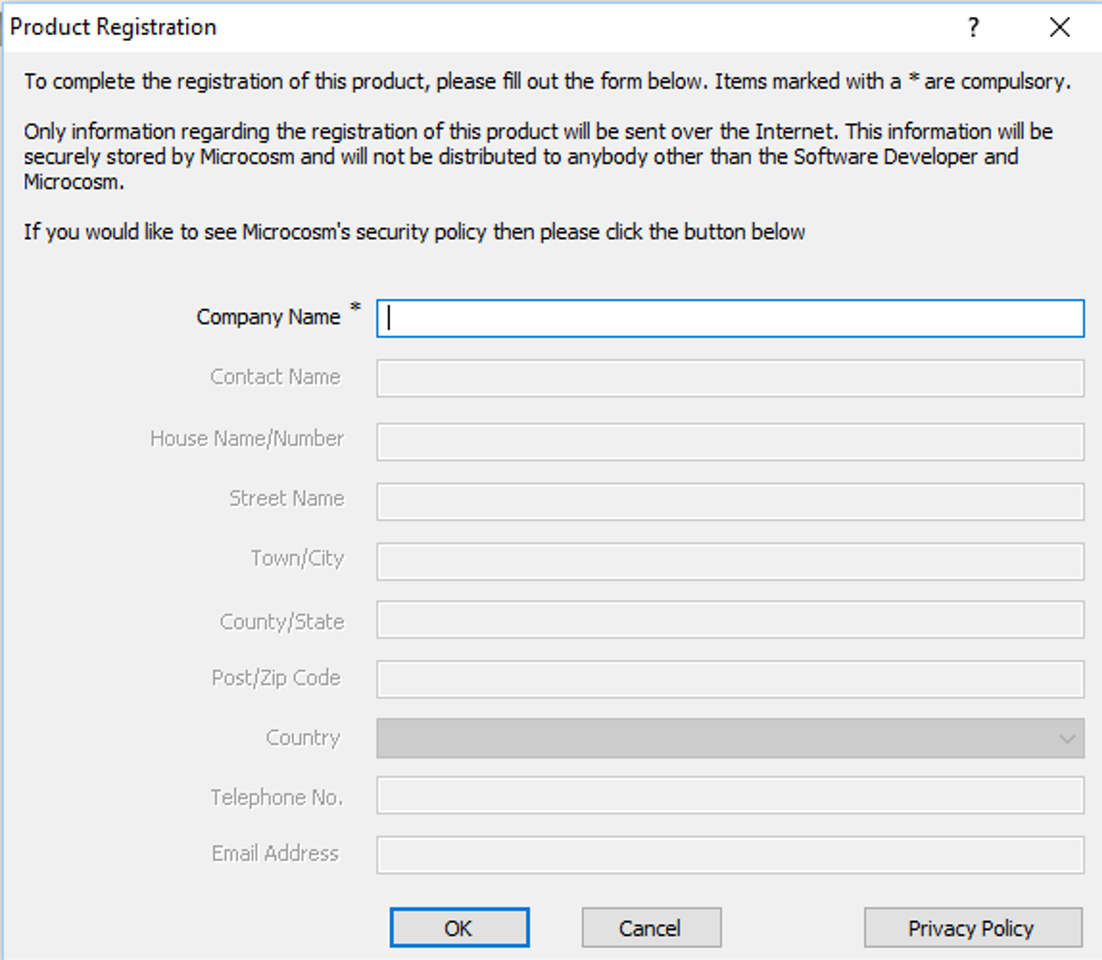
Next, input your details in the Product Registration window:
-
If successful, the following message will appear:
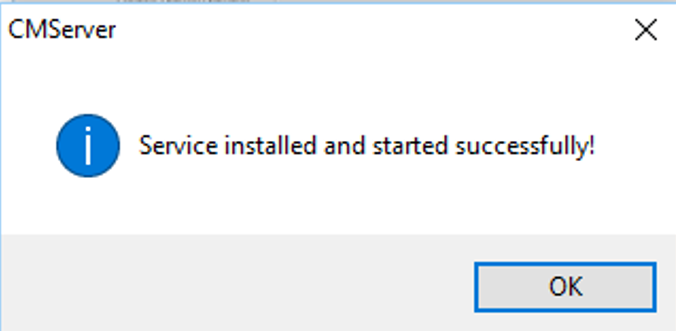
-
You may now install network clients on other machines.
Network Client Installation
Once the network license server is running, the OilFlow2D program and dependencies must be installed on each client workstation computer. Please refer to the Software Installation section. The steps below assume you have already run the installation program in the client computer and are ready to activate.
- To activate your software, open DIP shortcut on your desktop.
- In the Control Data section on the left side, go to Options and select License.
-
You will be prompted to select one of three options:
- Reactivate License
- Install Network License Server
- Check for Updates
-
Select Reactivate License
-
Select Configure as a Network Client.
Note
Note: In most cases the software will automatically detect the presence of the Network Server and the details will be filled in. If it does not fill this information in, input the IP address or computer name followed by.
-
The window shows the name of the network server ( in this example):
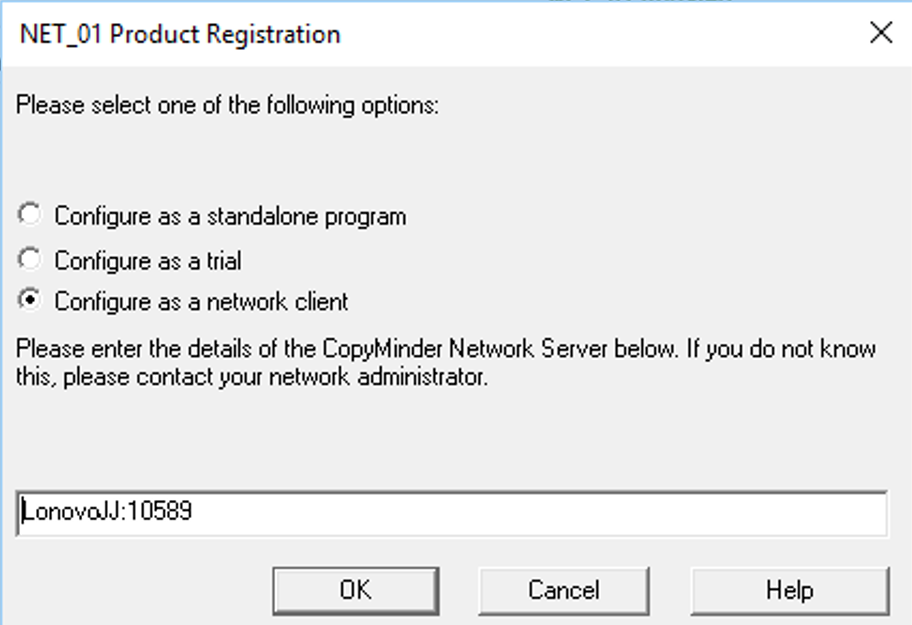
-
Click OK.
- Repeat this process for each OilFlow2D network client.
Note
Note: The software can be installed and configured as a network client on as many computers as desired in the network. In that case, the model will only run concurrently on as many computers as the number of OilFlow2D licenses that you have purchased.
Enabling Hydronia Plugins in QGIS
By default, the first time you run QGIS, the OilFlow2D plugin will not be enabled.
Enabling OilFlow2D Plugin
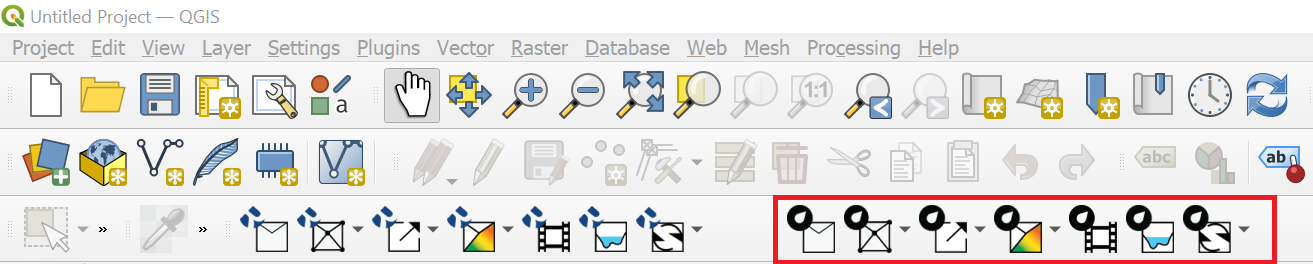
For OilFlow2D plugin, please enable it by selecting the OilFlow2D check box using the Plugins | Manage and Install Plugins... menu as shown.

Then verify that the OilFlow2D plugin icons appear in the QGIS toolbar area:
Enabling Macros in QGIS
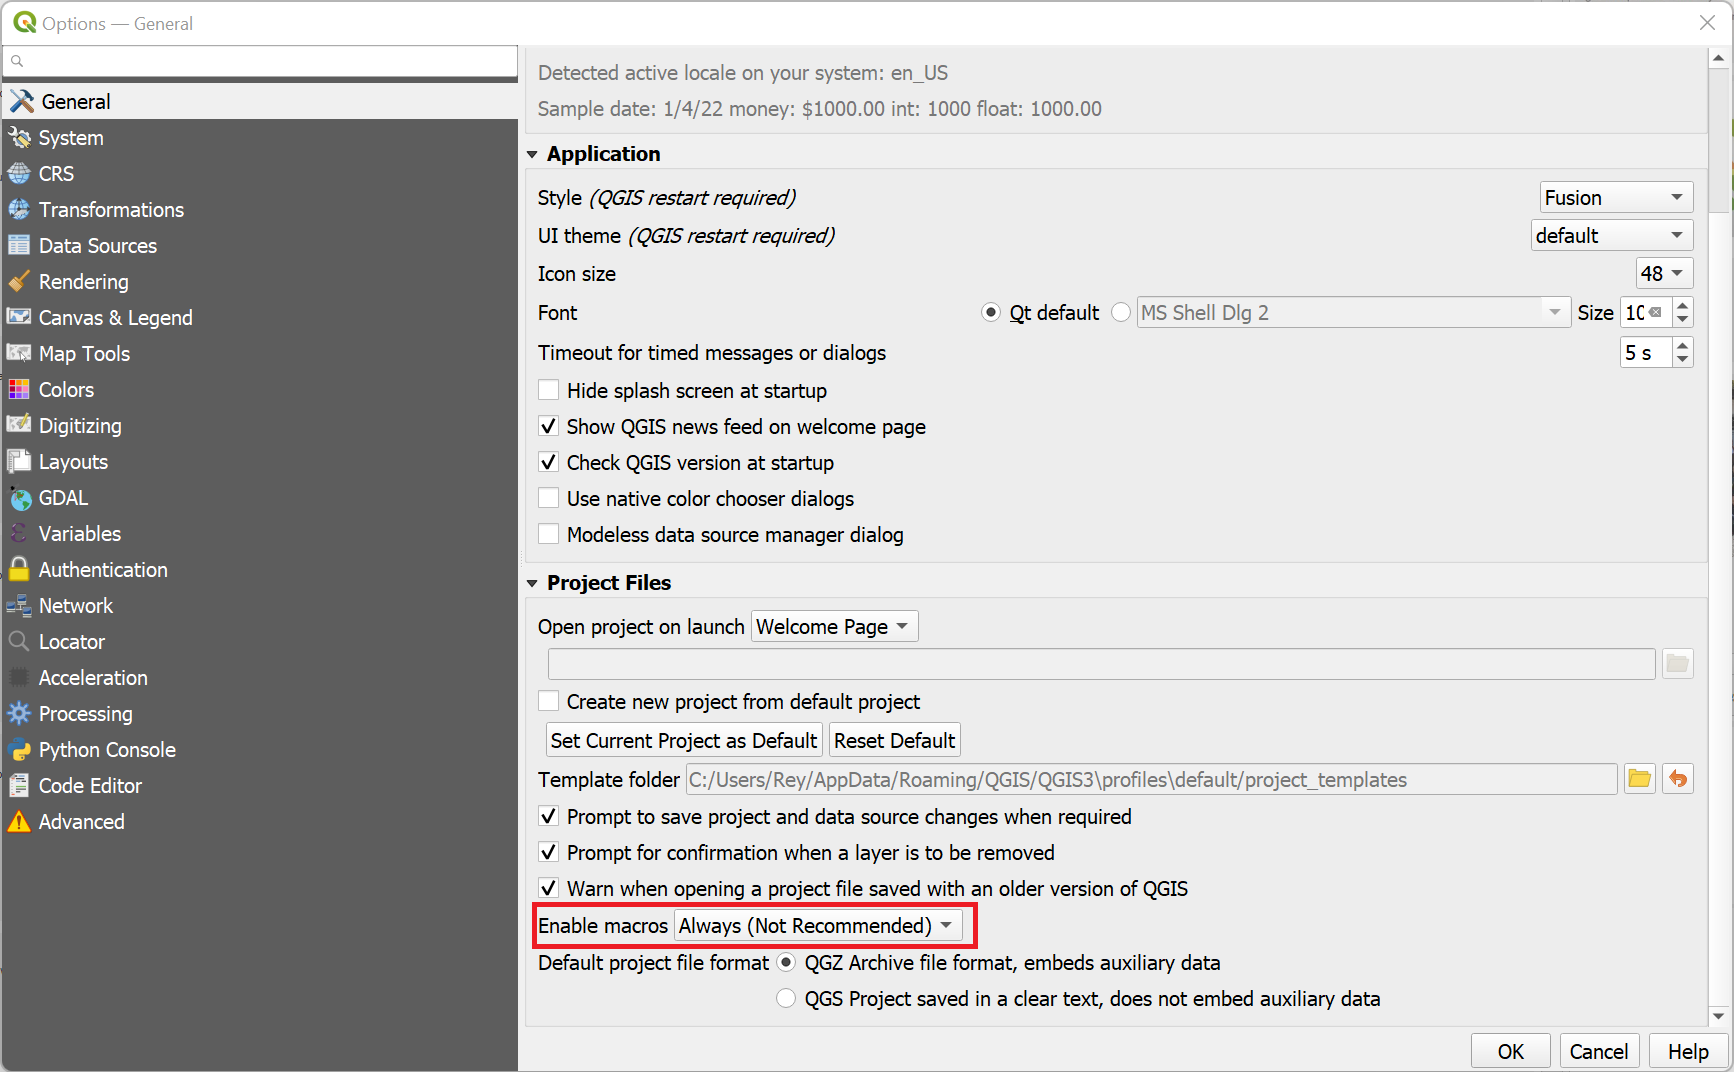
Successfully using the OilFlow2D plugin requires enabling the use of macros in QGIS. To do that, access the Options dialog by using the Settings | Options... menu, and in the General panel scroll down and select the Always option on the Enable Macros drop down list as indicated in the figure below.
Note
Please, do not pay attention to the (Not Recommended) warning on the option, since that is shown to warn about plugins of unknown origin, and that is not applicable to Hydronia Plugins.
Troubleshooting
In this section we include solutions to some issues that may occur during the software installation. Bear in mind that you may always contact Hydronia support team at to report any error message or problem that you may encounter during installation.
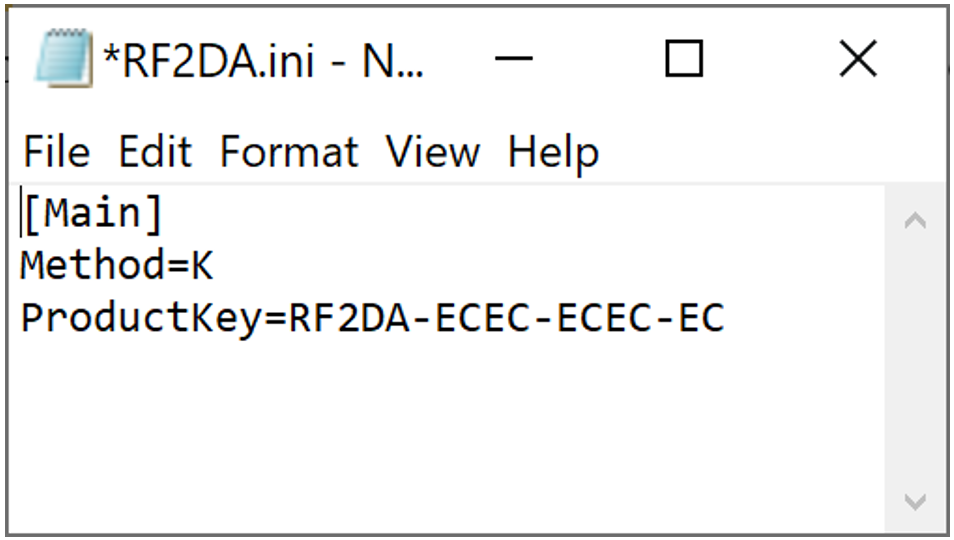
Finding your License Key
If you ever have an issue related to your installation, you can find the license key in the following files depending on the type of installation that you are using:
- Standalone:
C:\ProgramData\AVU\OF2DA.ini - Network License Server:
C:\Program Files\Hydronia\LicenseManager\OF2DA.ini
Open the file with Notepad or any other text editor, and your license key will be indicated following "\". In the following example the license key is:
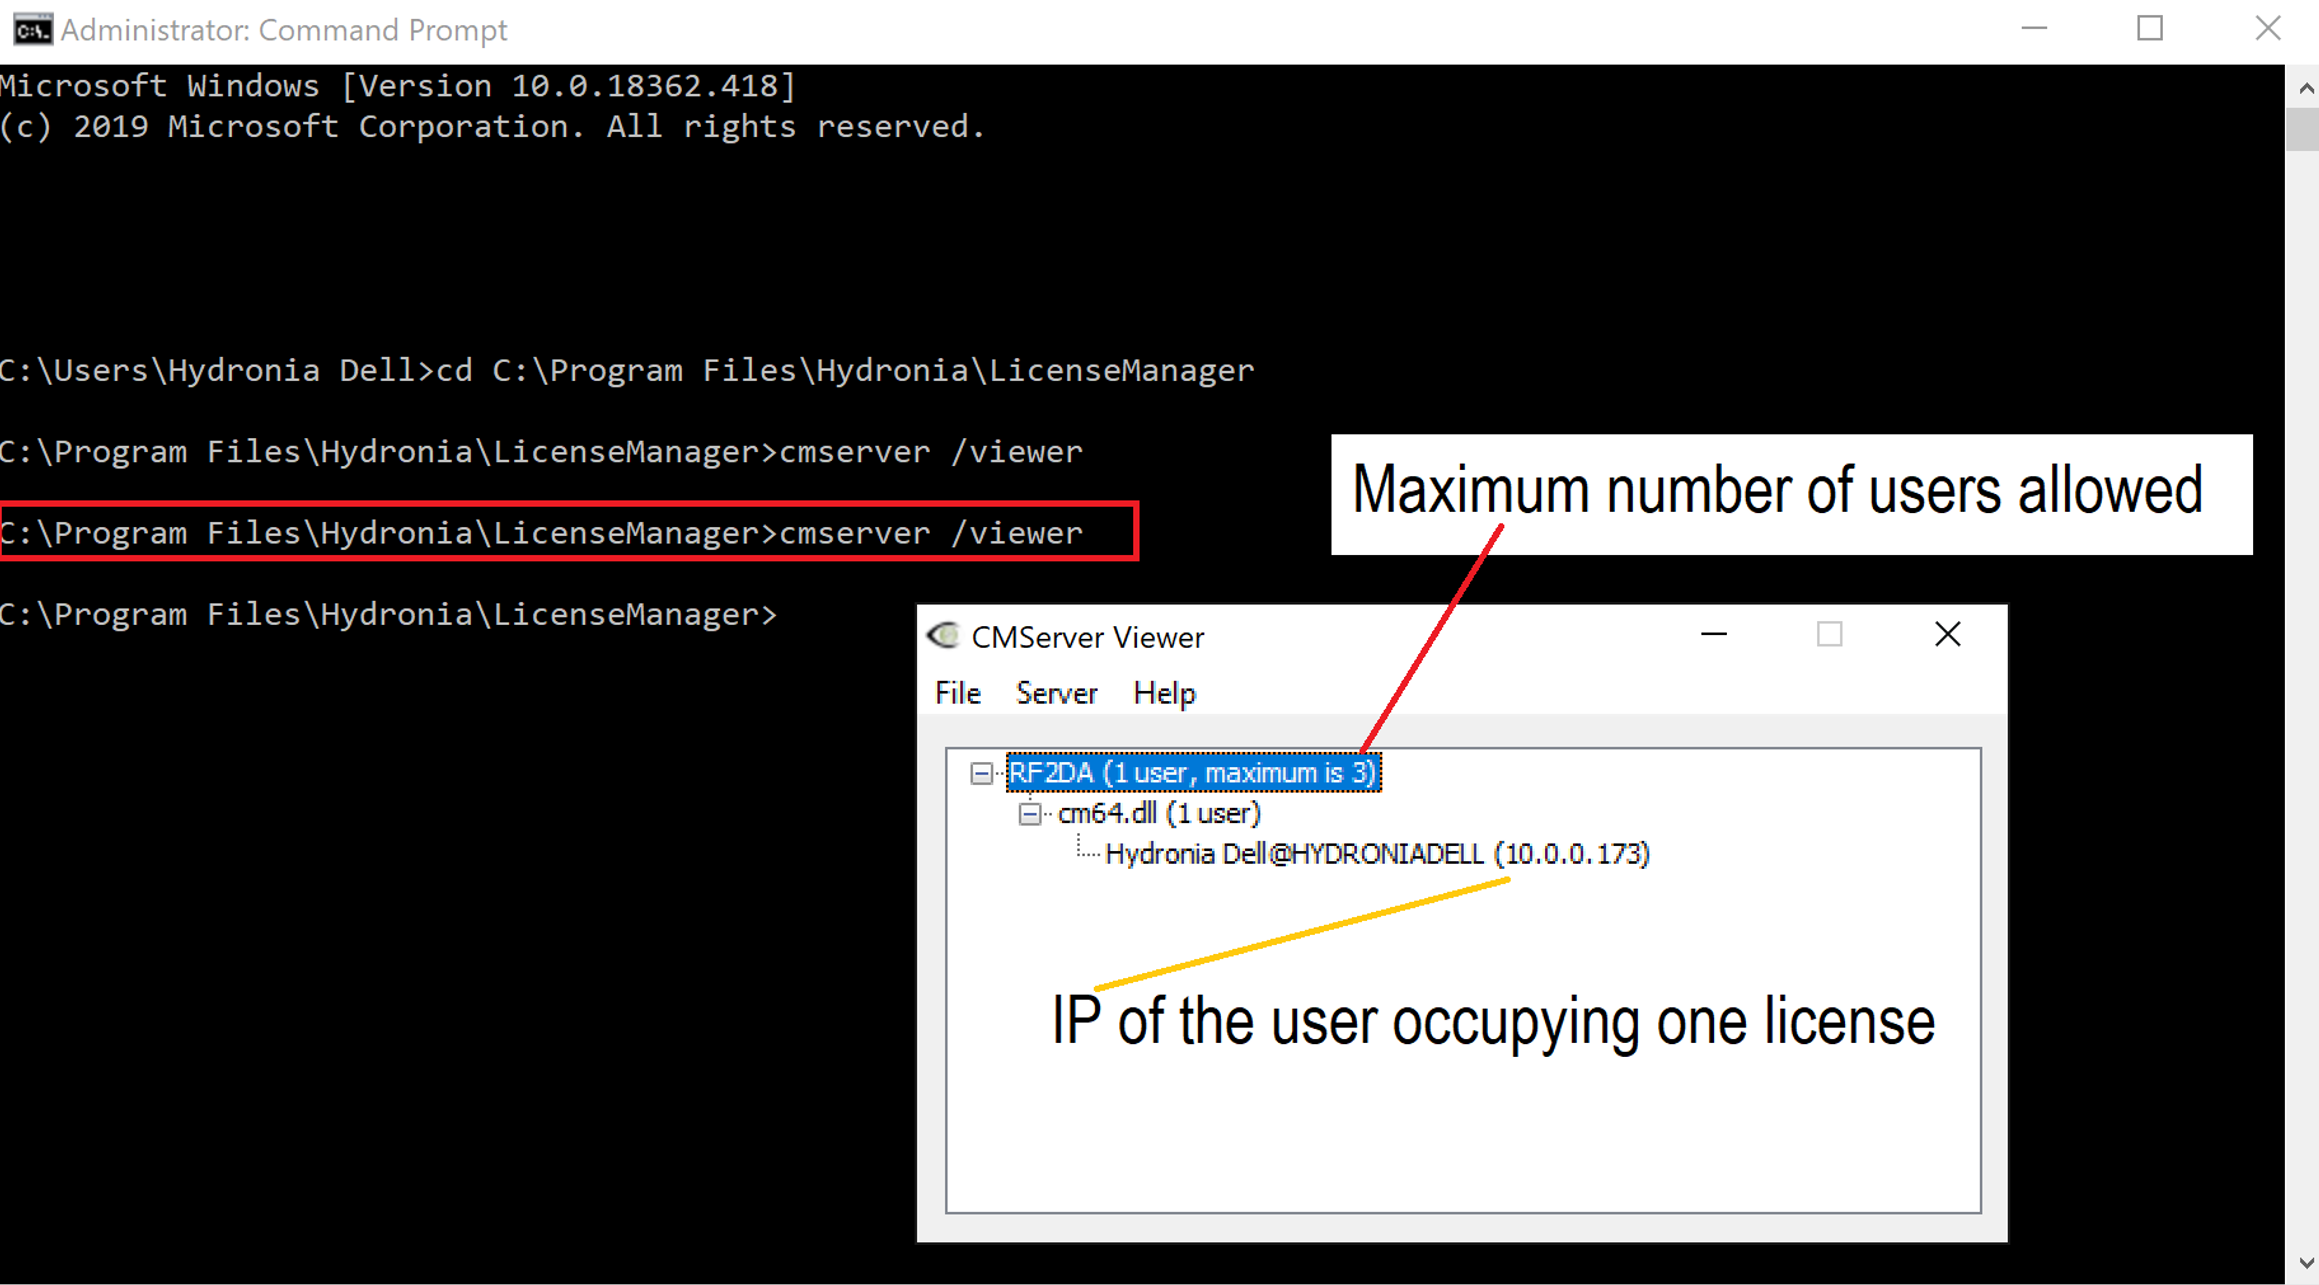
Find Who is Using the Software in a Network Installation
You can check how many users are occupying each license and know their computer ID using the viewer program that is installed on the folder.
In the , all the licenses in use are displayed, with the machine name or IP address and username.
If CMserver is running as a service, you can start the GUI for the viewer from the command line as follows:
- In the Windows search box write and then press Enter
- Enter and press Enter
- Enter and press Enter
The information displayed in the window will be similar as indicated in the following figure
ERROR 641: \"You have reached the limit on the maximum number of simultaneous users of this program.\"
This error can appear when there are more models trying to run than the number of available licenses. However, sometimes the run was interrupted at a critical stage and the model executable remains in memory. This is interpreted by the protection as if there was more licenses running. To fix this issue, open the Windows task Manager and in the Process tab look for the model executable, select it by clicking on the file and click End task. That will remove the model from memory and terminate the idle run.
ERROR 659: \"This program is configured for network installation only. It cannot be installed as a standalone system.\"
This error is frequently a result of specifying a Product Key on a network client machine instead of the License Manager Host Name. For a network installation, when the model is first run on a client machine, you should select Configure as a network client and enter the Host Name of the computer with the Network License manager installed. To solve the issue, follow the activation instructions above.
ERROR 660: \"This program is configured for standalone installation only. It cannot be installed as a network system\"
This error is the result of having used a license key that is for network installations only with a license that has been configured for standalone use. To solve the issue, please install the Network License Server as instructed in section on page and use the key provided by Hydronia.
ERROR 739: \"This program has been installed or copied too many times.\"
This error is generated when the OilFlow2D program has been installed or re-activated more times than allowed by the protection program. It does not necessarily indicates improper use of the model. If you get this error please send an email to our support team at indicating the error and your license key. With that information we will reset the license server to release the license.
If you do not know your license key, contact Hydronia support.
OilFlow2D Documentation
Find OilFlow2D documentation including this manual in the documentation folder installed with the software. The installation also includes example projects, videos, and other useful resources.
OilFlow2D Technical Support
If you have any questions or require assistance using OilFlow2D, please send an email to our support team at:
support@hydronia.com. Please make sure you visit our web site https://www.hydronia.com regularly to find out about new products and news about the software. Visit https://www.hydronia.com/software-updates to download the latest software update and the Release Notes document containing a list of the recent fixes, changes, and updates.
OilFlow2D Tutorials
The best way to get acquainted with OilFlow2D capabilities is following the tutorials. The accompanying OilFlow2D tutorials help you get started with the model and several of the model components. Each tutorial includes a set of files that you can use to do each exercise.